Tuesday, October 14, 2008

Binary & XML Serialization

Serialization is a method for implementing object persistence. It is the process of saving an object onto a storage medium or to transmit it across a network connection link in binary form. Process of serializing an object is also called deflating or marshalling an object. Similarly, deserializing data is referred to as inflating or unmarshalling.

Binary and XML serialization is very popular in the enterprise environment. The BinaryFormatter class is used for binary serialization (Namespace:  System.Runtime.Serialization.Formatters.Binary). Data can be written to a file and it can be retrieved easily. Code snippet for serialization & deserialization is given below.

using System.IO;
using System.Runtime.Serialization.Formatters.Binary;

private void Serialize(object data, string fileName)
{
    try
    {
        // Create the stream for writing data
        using (FileStream stream = new FileStream(fileName, FileMode.Create))
        {
            BinaryFormatter formatter = new BinaryFormatter();

            // Serialize the object
            formatter.Serialize(stream, data);

            // Cleanup
            stream.Close();
        }
    }
    catch
    {
        throw;
    }
}

The function accepts an object and it will be serialized to a file. One point is; to serialize a class, it should be marked with the Serializable attribute, as shown:

[Serializable()]
public class Employee
{
    // Code...
}

To deserialize the data, below given function can be used.

private object Deserialize(string fileName)
{
    object data = null;

    try
    {
        // Open the stream for reading serialized data
        using (FileStream stream = new FileStream(fileName,
                                                FileMode.Open,
                                                FileAccess.Read))
        {
            BinaryFormatter formatter = new BinaryFormatter();

            // Deserialize object
            data = formatter.Deserialize(stream);
        }
    }
    catch
    {
        throw;
    }

    return data;
}

The returned object can be converted to the original data (type-case operation).

In case of XML serialization, objects are serialized and deserialized into and from XML documents. There are several advantages for XML serialization - storing user preferences, maintaining security information across pages and applications, XML manipulation without using DOM, passing objects between application or domains,passing objects through firewall as XML string etc.

For XML serialization, we can create classes annotated with attributes or by using the XML Schema Definition Tool (Xsd.exe) to generate classes based on an existing XSD document.

Method 1 - Classes annotated with attributes

In this method, class members are annotated with certain attributes for serialization. Attributes like XmlRootAttribute, XmlAttributeAttribute, XmlElementAttribute etc. are applied at required levels. These attributes are available in the System.Xml.Serialization namespace. An XmlSerializer object is used for serialization & deserialization. Check the below link for an example:

http://giri.tp.googlepages.com/XMLSerializationDemo.zip

Method 2 - Classes generated using Xsd.exe (from existing XSD documents)

The xsd command (available from the Visual Studio Command Prompt) can be used for the generation of classes from XSD files. For example, save the below given XSD with name books.xsd.

<xsd:schema xmlns:xsd="http://www.w3.org/2001/XMLSchema"
    elementFormDefault="qualified">
<xsd:element name="bookstore" type="bookstoreType"/>
<xsd:complexType name="bookstoreType">
  <xsd:sequence maxOccurs="unbounded">
   <xsd:element name="book"  type="bookType"/>
  </xsd:sequence>
</xsd:complexType>
<xsd:complexType name="bookType">
  <xsd:sequence>
   <xsd:element name="title" type="xsd:string"/>
   <xsd:element name="author" type="authorName"/>
   <xsd:element name="price"  type="xsd:decimal"/>
  </xsd:sequence>
  <xsd:attribute name="genre" type="xsd:string"/>
</xsd:complexType>
<xsd:complexType name="authorName">
  <xsd:sequence>
   <xsd:element name="first-name"  type="xsd:string"/>
   <xsd:element name="last-name" type="xsd:string"/>
  </xsd:sequence>
</xsd:complexType>
</xsd:schema>

Now, from the Visual Studio command line, execute the following command to generate the C# class for this XSD file.

xsd books.xsd /c /l:cs

This will create a file books.cs in the current directory and it can be added directly to the C# project. The generated file will have all the necessary attributes for XML serialization.

Code snippets for converting an object to XML string and to reconstruct the original object from the XML is given below. This method is very useful in situations like passing objects across a network, through Firewall.

First, we need to define the class which is to be serialized/deserialized. Example:

public class Employee
{
    private string empID;

    public string EmpID
    {
        get { return empID; }
        get { empID = value; }
    }

    private string empName;

    public string EmpName
    {
        get { return empName; }
        set { empName = value; }
    }
}

Now, we can use the below functions for serializing/deserializing an Employee object.

using System.IO;
using System.Xml;
using System.Xml.Serialization;

public string Serialize(object data)
{
    string xml = string.Empty;

    try
    {
        using (MemoryStream stream = new MemoryStream())
        {
            XmlSerializer serializer = new XmlSerializer(typeof(Employee));

            UTF8Encoding encoding = new UTF8Encoding(false);

            // Text writer for writing XML data
            using (XmlTextWriter writer = new XmlTextWriter(stream, encoding))
            {
                // Serialize data
                serializer.Serialize(writer, data);

                using (MemoryStream tmpStream = (MemoryStream)writer.BaseStream)
                { 
                    // Get XML string from memory
                    xml = encoding.GetString(tmpStream.ToArray());
                }
            }
        }
    }
    catch
    {
        throw;
    }

    return xml;
}

public object Deserialize(string xml)
{
    object data = null;

    try
    {
        UTF8Encoding encoding = new UTF8Encoding(false);

        // Initialize memory stream using byte array
        using (MemoryStream stream = new MemoryStream(encoding.GetBytes(xml)))
        {
            // Text writer for writing XML data
            using (XmlTextWriter writer = new XmlTextWriter(stream, encoding))
            {
                XmlSerializer serializer = new XmlSerializer(typeof(Employee));

                // Deserialize object
                data = serializer.Deserialize(stream);
            }
        }
    }
    catch
    {
        throw;
    }

    return data;
}
Getting User/Group details in Windows

In one of the applications that I worked on recently, I had to determine whether the given username (loaded from XML) is actually a local username. First I felt its bit tricky. But instinct told me to look into WMI and I got the solution quickly.

The idea is to use ManagementObjectSearcher objects for searching the required WMI class. For a list of local users, we need to search for Win32_UserAccount. Win32_Group represents groups defined in the local system.

First, we need to add a reference to the System.Management component. Code snippets given below shows how to get the user & group listing:

using System.Management;

public string[] GetUsers(string machineName)
{
    return GetItems("Win32_UserAccount", machineName);
}

public string[] GetGroups(string machineName)
{
    return GetItems("Win32_Group", machineName);
}

private string[] GetItems(string className, string machineName)
{
    string[] items = null;

    try
    {
        // Prepare the select query
        SelectQuery query = new SelectQuery(className,
            string.Format("Domain='{0}'", machineName));

        using (ManagementObjectSearcher searcher = new ManagementObjectSearcher(query))
        {
            StringBuilder builder = new StringBuilder();

            foreach (ManagementObject mgmtObject in searcher.Get())
            {
                if (builder.Length != 0)
                    builder.Append('\t');

                builder.Append(mgmtObject["Name"]);
            }

            // Get the array
            items = builder.ToString().Split('\t');
        }
    }
    catch
    {
        throw;
    }

    return items;
}

The actual processing is done by GetItems(). Machine name can be obtained by using the System.Environment.MachineName property.

Now we can extend this to get all users in a specific group. The Win32_GroupUser class can be used for obtaining this information. If the computer is in a workgroup, we can pass the computer name (Environment.MachineName) to domainName parameter.

public string[] GetUsersInGroup(string domainName, string groupName)
{
    string[] users = null;

    try
    {
        string queryString = string.Format("GroupComponent=\"Win32_Group.Domain=\'{0}\',Name=\'{1}'\"",
                                                        domainName,
                                                        groupName);

        // Prepare the select query
        SelectQuery query = new SelectQuery("Win32_GroupUser", queryString);

        using (ManagementObjectSearcher objectSearcher = new ManagementObjectSearcher(query))
        {
            StringBuilder builder = new StringBuilder();

            foreach (ManagementObject mObject in objectSearcher.Get())
            {
                ManagementPath path = new ManagementPath(mObject["PartComponent"].ToString());
                if (path.ClassName == "Win32_UserAccount")
                {
                    // Split the path (2 parts)
                    string[] names = path.RelativePath.Split(',');

                    if (builder.Length != 0)
                        builder.Append('\t');

                    // Extract the 'Name' part
                    builder.Append(names[1].Substring(names[1].IndexOf("=") + 1).Replace('"', ' ').Trim());
                }
            }

            // Get the array
            users = builder.ToString().Split('\t');
        }
    }
    catch
    {
        throw;
    }

    return users;
}

If you face any issue - like getting incorrect data - have a look at the below link for troubleshooting tips.

http://support.microsoft.com/kb/940527

Remote Program Execution (using C# - WMI)

There are different methods for remote application execution. Using a client/server mechanism which sends commands to each other is a simple approach. Another one is by using .NET Remoting. One another method is by using the psexec utility, written by the great Dr. Mark Russinovich. (Personal comment: I admire his works and I believe that he is the ideal role model for all Windows programmers).

We will talk about yet another method here - using WMI. The Win32_Process class (WMI) can be used for executing processes in a remote machine. Code snippet is given below:

using System.Management;

private void RemoteExecute(string userName,
                                string password,
                                string path,
                                object[] commandLine)
{
    ConnectionOptions options = new ConnectionOptions();

    options.Impersonation = ImpersonationLevel.Impersonate;
    options.Authentication = AuthenticationLevel.Default;
    options.Username = userName;
    options.Password = password;
    options.Authority = null;
    options.EnablePrivileges = true;

    // Note: The ConnectionOptions object is not necessary
    // if we are connecting to local machine & the account has privileges
    ManagementScope scope = new ManagementScope(path, options);
    scope.Connect();

    // Create the process
    using (ManagementClass process = new ManagementClass("Win32_Process"))
    {
        process.Scope = scope;
        process.InvokeMethod("Create", commandLine);
    }
}

This code can be invoked as shown below:

object[] commandLine = { "cmd.exe", null, null, 0 };
RemoteExecute("username",
            "password",
            @"\\192.168.100.12\root\cimv2",
            commandLine);

Couple of important points to be noted: First, the launched application will not show any interface. It will be in hidden state. Also, it will not be possible to make it interactive.

Finally, WMI applications will not work if the remote machine is not configured properly. Check the below link for information about adding remote administration exception in Windows Firewall and other troubleshooting tips.

http://techblog-giri-csharp.blogspot.com/2008/10/using-wmi-with-c.html

Friday, October 10, 2008

Using WMI with C#

Windows Management Instrumentation (WMI) is the infrastructure for data management and operations on Windows-based operating systems. It is a set of extensions to the Windows Driver Model that provides an operating system interface through which instrumented components provide information and notification. WMI is Microsoft's implementation of the Web-Based Enterprise Management (WBEM) and Common Information Model (CIM) standards. It is pre-installed in Windows 2000 and newer OSs.

We can write WMI scripts or applications to automate administrative tasks on remote computers but WMI also supplies management data to other parts of the operating system and products. WMI allows scripting languages like VBScript or Windows PowerShell to manage Microsoft Windows personal computers and servers, both locally and remotely.

WMI has its on query language - Windows Query Language, or WQL. WQL allows developers to query WMI providers using a SQL-like syntax. If you know the provider classes and the fields available, then you can get the info very easily.  For instance, if you want to get a list of logical drives from a system you would use the following query:

SELECT * FROM Win32_LogicalDisk

You can, however, refine the search by using where clauses and getting specific "fields" in the query. The following query gets the amount of freespace, the size, and the name of all fixed disk drives:

SELECT FreeSpace,Size,Name FROM Win32_LogicalDisk WHERE DriveType=3

.NET provides very good support to WMI, through the System.Management namespace. It has a number of classes that can be used for accessing WMI services.

ConnectionOptions
ManagementScope
ObjectQuery
ManagementObjectSearcher
ManagementObjectCollection
ManagementObject

Code snippet for collecting drive details (using the previous query) is given below. First of all, we need to add a reference to the System.Management .NET component.

using System.Management;

private void DiskStatisticsUsingWMI()
{
    // Connection credentials for the remote computer
    ConnectionOptions conn = new ConnectionOptions();

    conn.Username = "username";
    conn.Password = "password";

    // The machine to be connected (the root namespace)
    ManagementScope ms = new ManagementScope(@"\\192.168.100.12\root\cimv2", conn);

   // Get Fixed disk stats
    ObjectQuery query = new ObjectQuery("SELECT FreeSpace,Size,Name FROM Win32_LogicalDisk WHERE DriveType=3");

    // Execute the query 
    ManagementObjectSearcher searcher = new ManagementObjectSearcher(ms, query);

    // Get results
    ManagementObjectCollection objectCollection = searcher.Get();

    // Loop through found drives and write out info
    foreach (ManagementObject mgmtObject in objectCollection)
    {
        Console.WriteLine("Name : " + mgmtObject["Name"].ToString());
        Console.WriteLine("FreeSpace: " + mgmtObject["FreeSpace"].ToString());
        Console.WriteLine("Size: " + mgmtObject["Size"].ToString());
    }
}

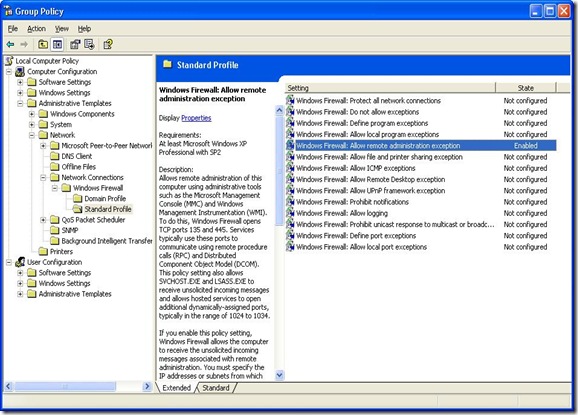
An important point: if Windows firewall is enabled in the remote system, we need to define an exception for WMI to access that machine from outside. Otherwise, the firewall will block calls to the system. In the machine to be connected, we need to define a policy for allowing remote administration. To do this, launch gpedit.msc from the Start -> Run and move to Computer Configuration -> Administrative Templates -> Network -> Network Connections -> Windows Firewall. Expand Domain Profile is the computer is in a domain, otherwise expand Standard Profile (the machine is in a workgroup). Double click on Windows Firewall: Allow remote administration exception and select Enabled to enable the exception. Check the screenshot given below.

WMI_Policy

Now this machine is ready to accept WMI queries. This should allow the calling application to work. Check the below links, for more troubleshooting details.

http://msdn.microsoft.com/en-us/library/aa389286.aspx
http://support.microsoft.com/kb/875605

XML - Read/Write binary data (Base64)

XML is an industry standard for data transfer. Usually normal text is stored in XML, but it is possible to store any type of data in an XML file - songs, pictures, documents, executable files etc. Base64 encoding is used for doing this.

Functions listed below can be used for storing binary data in XML and retrieving it. In this example, the filename is also stored in the XML while saving, so that it can be used for retrieval (not mandatory; just application logic).

First, define a constant for the buffer size to be used.

private const int BUFFER_SIZE = 1024;

Code for writing binary data:

using System.IO;
using System.Xml;

private void WriteBase64Data(string sourceFile, string targetFile)
{
    try
    {
        byte[] data;

        using (FileStream fStream = new FileStream(sourceFile,
                                                                FileMode.Open,
                                                                FileAccess.Read))
        {
            // Read data and store it in the buffer
            using (BinaryReader reader = new BinaryReader(fStream))
            {
                data = reader.ReadBytes((int)fStream.Length);
                reader.Close();
            }
            fStream.Close();
        }

        using (MemoryStream memStream = new MemoryStream())
        {
            using (StreamReader reader = new StreamReader(memStream))
            {
                using (XmlTextWriter writer = new XmlTextWriter(memStream,
                                                                                System.Text.Encoding.UTF8))
                {
                    writer.WriteStartElement("BinaryData");

                    // Write the filename
                    writer.WriteStartElement("FileName");
                    writer.WriteValue(sourceFile.Substring(sourceFile.LastIndexOf('\\') + 1));
                    writer.WriteEndElement();

                    // Write actual data
                    writer.WriteStartElement("Data");
                    writer.WriteBase64(data, 0, data.Length);
                    writer.WriteEndElement();

                    writer.WriteEndElement();

                    writer.Flush();
                    memStream.Position = 0;

                    StringBuilder xmlData = new StringBuilder();
                    xmlData.Append(reader.ReadToEnd());

                    XmlDocument xDoc = new XmlDocument();
                    xDoc.LoadXml(xmlData.ToString());

                    // Save to disk
                    xDoc.Save(targetFile);

                    memStream.Close();
                }
            }
        }
    }
    catch
    {
        throw;
    }
}

Code for reading binary data from XML:

using System.IO;
using System.Xml;

private void ReadBase64Data(string sourceFile, string targetPath)
{
    try
    {
        XmlDocument xDoc = new XmlDocument();
        xDoc.Load(sourceFile);

        XmlNode fileName = xDoc.SelectSingleNode("BinaryData/FileName");
        XmlNode data = xDoc.SelectSingleNode("BinaryData/Data");

        // Set output directory
        string targetFile = targetPath;
        if (!targetFile.EndsWith(Path.DirectorySeparatorChar.ToString()))
            targetFile += Path.DirectorySeparatorChar;
        targetFile += fileName.InnerText;

        using (FileStream target = new FileStream(targetFile,
                                                                FileMode.Create,
                                                                FileAccess.ReadWrite,
                                                                FileShare.ReadWrite))
        {
            int bytesRead = 0;
            byte[] buffer = new byte[BUFFER_SIZE];

            using (BinaryWriter writer = new BinaryWriter(target))
            {
                StringReader sr = new StringReader(data.OuterXml);

                using (XmlTextReader reader = new XmlTextReader(sr))
                {
                    reader.MoveToContent();

                    // Read raw data and write to output stream
                    do
                    {
                        bytesRead = reader.ReadBase64(buffer, 0, BUFFER_SIZE);
                        writer.Write(buffer, 0, bytesRead);
                    }
                    while (bytesRead >= BUFFER_SIZE);
                }

                writer.Flush();
            }
        }
    }
    catch
    {
        throw;
    }
}

Output Redirection in C#

Sometimes, it will be necessary to redirect the output of a command to a variable or a control. This is very useful when we are working with DOS commands, which display data in the console that can be used by the application. For example, if you want to process the output of a command such as TASKLIST or some other third party command which lists useful information (which does not have any programming interface), this technique is useful.

What we need to do is to redirect the input, output and error streams to our stream variables and use them for putting data and reading results. Below code snippet demonstrates this concept:

using System.IO;
using System.Diagnostics;

private void RedirectOutput(string command,
                            out string outputMessage,
                            out string errorMessage)
{
    using (Process proc = new Process())
    {
        ProcessStartInfo psI = new ProcessStartInfo("CMD.EXE");

        psI.UseShellExecute = false;

        // Choose the streams to be redirected
        psI.RedirectStandardInput = true;
        psI.RedirectStandardOutput = true;
        psI.RedirectStandardError = true;

        // Do not create a new window
        psI.CreateNoWindow = true;

        proc.StartInfo = psI;
        proc.Start();

        // Create writer/reader objects for redirection
        using (StreamWriter writer = proc.StandardInput)
        {
            using (StreamReader reader = proc.StandardOutput)
            {
                using (StreamReader errorReader = proc.StandardError)
                {
                    writer.AutoFlush = true;

                    // Write the command
                    writer.WriteLine(command);
                    writer.Close();

                    // Get output & error messages
                    outputMessage = reader.ReadToEnd();
                    errorMessage = errorReader.ReadToEnd();
                }
            }
        }
    }
}

By following this method, it is very easy to develop applications with functionality similar to TELNET. The above code can be modified easily to make the session interactive.

IP Address Change Notification

Recently I worked on a project, where I had to do some processing (reconnecting logic) whenever the IP address of the machine is changed. First, I felt that its going to be decently complex. But after a bit of R & D work, I came to know that it is surprisingly easy to do this with .NET! (such is the power of .NET Framework classes).

All I had to do was to register an event listener for the NetworkAddressChanged event (System.Net namespace). I did it on the application startup.

NetworkChange.NetworkAddressChanged += new System.Net.NetworkInformation.NetworkAddressChangedEventHandler(this.AddressChangedCallback);

Whenever the IP address of the machine is changed, the AddressChangedCallback() will be called. And thats it!

private void AddressChangedCallback(object sender, EventArgs e)
{
    NetworkInterface[] adapters = NetworkInterface.GetAllNetworkInterfaces();
    foreach (NetworkInterface n in adapters)
    {
        System.Diagnostics.Trace.WriteLine(n.Name + " is " + n.OperationalStatus); 
    }
}